Facebook advertising can be confusing and you may be sceptical about the value it adds to your business, but with a little know-how you can make it work for you. Whether you are looking to grow your followers, increase your engagement (likes, comments and shares) or grow sales, Facebook advertising may well just be your new best friend. Here we walk you through the basics of getting started with your Facebook ads.

Getting started with Facebook advertising to grow your business
 by Amy Rountree
Why use Facebook Ads?
Facebook advertising can drive immediate results in revenue, sales and leads for your business as well as help you grow your followers and engagement.
While we’d all love to think we can use social media to reach thousands of customers for free, the reality is different. Not all content you post is going to have that explosive, viral impact we long for but Facebook advertising does ensure you reach more customers. And it doesn’t need to be expensive, Facebook Ads offers one of the cheapest forms of advertising in the marketplace. Ready to get going? Let’s get into it.
Step 1: Setting up an Ads Manager on Facebook
Before you can get going with Facebook Ads, you’ll need a Facebook Business Page and to set up your Facebook Ads Manager. Here we show you how.

Add your Facebook Ads account to your Business Manager to be able to advertise on Facebook and Instagram.
Step 2: Create a Facebook Ad
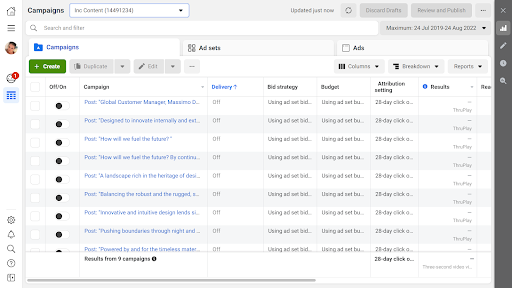
Login to Facebook Ads Manager and click the green ‘Create’ button to get started with a new Facebook Ad campaign.
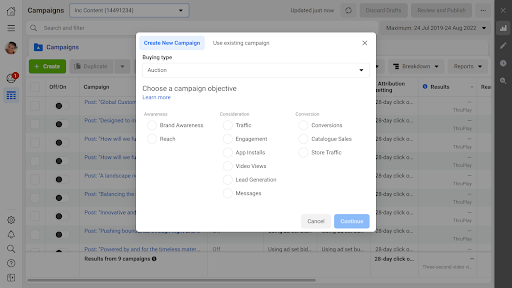
When you’re ready to create an ad, the first thing you’ll be asked to do is set your objective. An objective tells Facebook what you are hoping to achieve with your ad such as whether you want to drive likes, comments and shares, or drive traffic to your website.
Getting your objective right is crucial so Facebook understands what your aim is for your advertising and can help deliver your ads to the right people. Facebook knows a lot about its 2.4 billion worldwide users across Instagram and Facebook. They have information about their users such as gender, age and location as well as a strong understanding of their interests and the likelihood they will behave in a certain way online. Creepy eh?
There are 11 different types of Facebook Ad objectives but here we keep it simple. Here’s a breakdown of the types you might want to use when you’re getting started.
Awareness Ads. Facebook shows your advert to as many people as possible.
The ‘Reach’ objective can be useful for a small business targeting a specific local area.
Consideration Ads. Facebook shows your ad to those people most likely to take the action you want. The ‘Traffic’ objective means Facebook will show your ads to the people most likely to click through to your website. Using the ‘Engagement’ option means Facebook will show your ads to those people most inclined to like, comment or share your post. This is a great way of growing your Facebook page.
Conversion Ads. Facebook shows your ad to those people most likely to actually convert into a sale or a lead for your business.
Choose the objective that is aligned with what you want to achieve.
Next you’ll be asked to give your campaign a name, add images or video, a headline, description and URL if relevant, and select your budget. Advertising spend can easily be squandered, so start small, trial different tactics, and be prepared to build and adjust as you go as you see things working. You can advertise from as little as £1 per day on Facebook. Why not test a spend of £10 and see what results you get before increasing your budget?
Once set up, you can see a preview of what your ad will actually look like in different 'placements'. Placements is just fancy speak for where your ad appears eg. mobile news feed or desktop news feed.
Either save to drafts or click the green 'Publish' button to wait for Facebook to review your ad.
Step 3: Adding a Facebook Pixel to your website
If you’re promoting an online store with Facebook advertising, you’ll want to choose either the ‘Traffic’ or ‘Conversions’ objective. In order to track traffic and conversions, you’ll need to add the Facebook Pixel to your website. It’s all starting to sound a bit technical now isn’t it? Let’s take a breath and get to grips with it.
If you’ve ever been followed around Facebook or Instagram by a website you’ve been on, well that’s the pixel in action. The Facebook pixel is a bit like a cookie – it records the behaviour of anyone on your website and reports back to Facebook. It learns as it goes and communicates the learnings back to Facebook. Facebook begins to use that knowledge to decide who and where to show your ad. Once working, your pixel will look for the people most likely to take the action you want them to.
Retargeting is a trick the Facebook pixel has up its sleeve. Once the pixel is on your site, Facebook will show ads to people who have browsed, but maybe perhaps not purchased; all designed to get people who are showing consideration of your product, to convert.
Don’t be put off by the jargon. An Ads Pixel is simply a snippet of code you or the person who built your website can easily add to your site to track any sales that have happened as a result of your Facebook or Instagram advertising. And don’t worry, Shopify, Woo, or Wix websites (among others) allow you to paste the code into your website settings.
To create a pixel in Facebook
- Go to Business settings in Business Manager.
- Select your business.
- Click ‘Data sources’.
- Select ‘Pixels’.
- Click the + Add button
- Enter a name for your pixel.
- Optional: Enter your website URL
- Click ‘Continue’.
- To install your pixel on your website, click ‘Set up the pixel now’.
Add a Facebook Pixel to your website

Adding a Facebook pixel to your website means you can track visitors to your website and then retarget them with Facebook and Instagram ads.
Step 4: Create an audience for your Facebook ads
Did you know that Facebook Ads can be targeted with laser-precision to the exact customers you want?
You can create three different types of audience within the Facebook Ads manager. Let’s break them down.
Saved - this is easy. This is basically a ‘cold audience’, one that has perhaps never come across you before. This audience type allows you to add behavioural and interest targeting; gender and demographic information. So if you want to advertise to women between 25-45 in Blackpool who like shoes, you can do that. You can then save these to use again.
Custom - A Custom Audience allows you to take your Facebook page and Instagram page and build an audience based on who and how it's been engaged with over a period of time. You can also upload your customer email addresses here, and display ads to anyone you’ve also got on your email list (as long as the email you have for them is the same they log in to Facebook with). Or you can use data that your Facebook Pixel has collected from your website.
The Facebook Pixel records the behaviour of anyone on your website and reports back to Facebook. And actually it's a clever clogs, because it learns as it goes and communicates that back to Facebook. Facebook begins to use that knowledge to decide who and where to show your ad. Meaning your pixel, once firing, will look for the people most likely to do the thing you want them to.
Lookalike - this is the clever stuff, made easy. So let’s say you have created a custom audience from your email addresses, page engagement or pixel data. A Lookalike is where you take a ‘Custom Audience’ (and you can only do it on custom audiences) and find the top 1% of people in the UK or any place, who match your existing custom audience. Facebook will then find all the people in your Custom Audience, and then look for more people it thinks might be similar based on their Facebook activity.
Step 5: Monitoring your Facebook Ads performance
You can see how your ads are performing in the Facebook Ads Manager. If a campaign isn’t performing well, put your money into an ad that is instead.
If you’re just starting out and are a bit hesitant to use Facebook Ads, why not start with a really small budget and a selection of different ads and objectives with different audiences? Testing small will help you learn what works for you.
Maybe* makes it really easy for you to manage your ads performance.

Keep an eye on your Facebook ads and measure their success.
How can Maybe* help?
When you sign up to Maybe* we ask you to connect your social media accounts. To be able to use Maybe* to manage your Facebook Ads you’ll need to connect your Facebook Ads account separately. Don’t worry, it's easy.
Connect your Facebook Ads account to Maybe*

Connect your Facebook Ads account to Maybe* to manage and monitor all your ads across Facebook and Instagram in one place.
Once you’ve connected your Facebook Ads account to Maybe*, you can manage and monitor all your ads in one place. You'll get an easy to understand report on your ads performance, build audiences and boost your best performing social media posts.
Boost a Facebook or Instagram post

Use Maybe* to boost your Facebook and Instagram posts from within Maybe* and turn them into awesome ads.
Need more help?
Every Thursday at 10am we host a ‘Getting started with Facebook Advertising’ training session. So if you’re starting out as a complete novice we have you covered. If you’re a bit more advanced and want to take your existing Facebook Ads strategy to the next level, join us on Fridays at 10am for our Advertising Masterclass!


Recent posts

Social media news roundup 23rd October – Instagram’s spicing up comments with polls, Facebook Pages hitting the airwaves, and more
Step right up and ride the digital carousel with us 🎠 As the wheels of the social media funfair whirl and twirl, platforms are aimin...
Don’t miss out on the ultimate guide to daily hashtags for social media success
Daily hashtags are a great source of content inspiration and a super way to increase your social media reach Daily hashtags are a ...